7.29.2012

Don't Forget to Floss!

In these days of Pinterest and up cycling the saying "one man's trash is another man's treasure" has never held more true. If you're like me and feel bad wasting craft materials you probably have tons of leftover embroidery floss that is not quite long enough to start a new project. Now you can use those scraps to add a fun pop of color to an ordinary charm à la Urban Outfitters!


What You'll Need:
Necklace 
Embroidery floss
Wire  
Jump Ring
Scissors


First, twist together your embroidery floss and thread through the jump ring. Pinching the floss together, wrap the wire around the embroidery floss (approximately 10 times) at the base of the jump ring.


Lastly, cut off the excess wire. Undo your necklace and slide on the new jump ring!

 
xx,CC

7.08.2012

Cameo Appearance

It is no surprise that Miu Miu, better known as Prada's quirky little sister, would take an Edwardian classic like the cameo and reinvigorate the age-old staple with a modern spin. The Cammeo Cristal Collection features silhouettes vaguely reminiscent of the 1920s. Women in cloche hats and flapper headpieces are set against oval backdrops of cherry red, cerulean blue, and hot pink. Add a pair of head-turning earrings to denim cut-offs or a bejeweled necklace to a cotton shift for an Art Deco vibe. You can bet if Daisy Buchanan were on the summer party circuit this is exactly what she'd choose!


What You'll Need:
Miu Miu printout
Pendant necklace
Scissors
Mod Podge
Brush
Hot glue gun


First, print out the image of the cameo. You will have to play with the size of the image to get the silhouette to fit on your existing pendant. Cut out the oval around the cameo. Next, paint the Mod Podge on the surface of your old pendant and apply the oval cut out on top while taking care to smooth any creases.


 After the paper applique has dried (usually about 5 minutes), paint a layer of Mod Podge over the paper to give the cameo a glossy finish. Once dry, use a hot glue gun to reassemble your pendant. My outdated "Juicy" pendant had a cloth backing and rhinestone setting that I ripped apart, but you can make earrings, bracelets, or rings using this method!

xx,CC

3.22.2010

Face Time

If iphones and crackberries seem omnipresent these days, it's because they are - iPhone sales doubled last quarter. While that's great for Mac-lovers everywhere, some of us fashion enthusiasts are having a hard time accepting our way of keeping an eye on the clock has changed. Though the watch is seemingly becoming obsolete, the accessory has extended its life line by serving fun over function. For example, Dolce and Gabbana's Fall '09 collection featured chunky necklaces as an homage to the grandfather's pocket watch. Now Tom Binns has jumped on the bandwagon with his collection of faceless timepieces ranging in colors from neon to classic gold. As for what the future holds for the classic timepiece... we'll just have to watch out next season.


What You'll Need:
Link watch
Metal paint
brush

This project can be done in one of two ways. If you like the watch dial and link band as is, simply use a brush to paint over the face of the watch in a neat circle. Try to match the paint as closely as possible to the original metal. If you'd rather the entire watch be one color, simply spray paint the entire thing.


xx,CC

2.14.2010

A Bolder Shoulder

From the flak jacket to cargo pants, uber-cool labels such as Rag & Bone, Y-3, and Alexander Wang confirmed military inspired get-ups are back with a vengeance for spring. This masculine trend can make some feel a bit skittish, but there's something to be had for everyone. Epaulettes, favored in the most extreme form by Lady Gaga, add the perfect finishing touch to any shirt or dress. Dressed up for an evening out or down for casual Friday, this army staple infuses a bit of extra polish into any occasion. Now that's something to salute!

Clockwise from top right: Kate Moss for Topshop, Balmain, Falconiere, Andrew Gn. Center: Alice + Olivia

What You'll Need:
T-shirt

1 sheet felt

Chain

Needle nose pliers

Needle

Thread
Sewing pins

Scissors


Begin by cutting two elliptical shape pieces (about the size of your shoulder) out of the felt. Next, sew the chain onto your felt pieces in a spiral pattern starting from the outside and working your way to the center.


Next, determine the placement of the epaulettes on your shirt (it helps to have the shirt on) and pin in place. Sewing around the outside edge of the felt, secure the epaulettes to the shirt. Lastly, drape some extra chain around the outside edge using your pliers.


xx,CC

1.31.2010

Barbarella

The seemingly bleak economical and environmental outlook these days leaves people yearning for protection and security. This climate can't help but impact designers during their creative process, so it is no wonder tougher, utilitarian jewelry is making its way onto the scene. Case in point? Staple Brit label Burberry Prorsum and the recently launched Dannijo. Both lines used barbed wire as inspiration for bracelets that send a "Don't mess with me" message. Juxtaposed with dainty, ethereal dresses, these bracelets will keep you looking sharp all spring!

What You'll Need:
3 yards thin leather cord
Jewelry clasp

One bead

Superglue

Scissors


Begin by cutting two pieces of cord, each one yard long. Tie a knot at one end, then twist the two strands together and tie another knot about six inches from the opposite end. Slip on your bead then tie another knot, adding your jewelry clasp, to secure it in place. This serves as the length of the bracelet that you will wrap around your wrist.


Now it is time to make the barbs. Cut your remaining yard of leather cord into five inch pieces. While pinching the small piece of cord to the bracelet with your thumb and forefinger, wrap the loose end around itself and over the end you are pinching about three times. Leave the last loop a bit loose and slide the end of the cord under the loop, which acts as a knot to keep the barb from unwrapping.


Put a dot of superglue over the knot and snip off the excess cord. Make one barb at four inch intervals along your entire bracelet.


xx,CC

1.25.2010

Waist Management

While one typically thinks of cording and tassels as a home decor staple, Hannah MacGibbon clearly had another use in mind for the drapery accents while designing the Chloé Fall 2009 collection. After a rocky first season as head designer for the French fashion house, MacGibbon finally struck a high note as she adorned her collection of comfy coats and khakis with demure fringe accents on clutches, blouses, and, of course, belts. Wrapped around a luxe velvet skirt, the interwoven metallic and black silk threads recall the regal days of the court of Versailles. What better way to infuse a little luxe into your everyday wardrobe?


What You'll Need:
Black velvet skirt (thrifted for $5.00)

Black and metallic cord (approximately 2 yards)
Two black tassels

Black satin ribbon (1/2" width)
Needle

Thread

Scissors


After threading your needle, stitch around the end of the cord a few times so it will not unravel. Attach one tassel to each end of the cord by sewing through the center of the tassel and knotting multiple times. Wrap the satin ribbon around the spot where the tassel meets the end of the cord and secure by sewing for a finished look. Wrap your belt around a velvet skirt for a runway ready look or add to skinny jeans or harem pants for a look all your own!


xx,CC

1.14.2010

Buckle Up

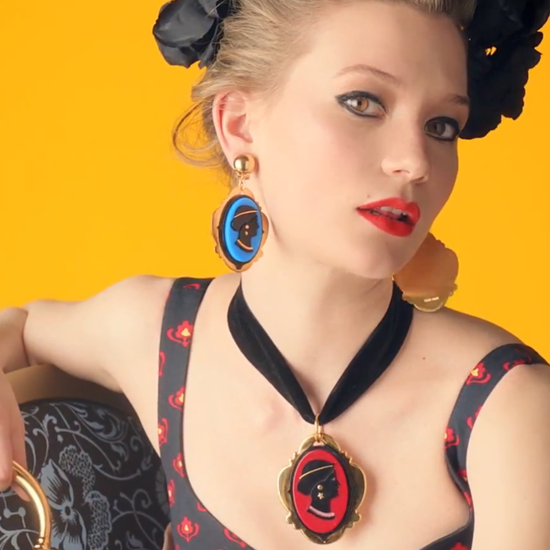
The holidays are officially over, your energy is zapped, and there is nothing to look forward to in the dreary months of February and March; it's no wonder you wake up every morning and throw your hair into a lackluster bun or braid! Thank goodness Eugenia Kim, milliner to the stars, is here to save the (no good very bad hair) day with her embroidered buckle headband. Handpicked by Lucky editors as a surrealist statement piece, it's the perfect winter accessory - everyone will notice your shining hair and cute new eyeshadow instead of the same coat you've been forced to wear since November.


What You'll Need:
One piece of felt

Wide headband

Black grosgrain ribbon 2" width

Scissors

Hot glue gun

Black Sharpie


Begin by cutting the piece if felt into a wide strip. Be sure it is long enough to cover the entire headband; cut diagonally along the arrows below.


Put a dot of hot glue on one end of the headband, and press one end of the felt strip down on the glue. Make thin lines of glue along the inside edges of the headband and press the felt under. Make sure the felt is smooth along the outside surface of the headband. To create a finished look (and prevent glue from yanking out your hair!) glue the black ribbon on the inside of the headband. Cut off the excess ribbon with scissors.


Now it is time to add the trompe l'oeil buckle with a Sharpie. Near the top of the band, draw a large square covering the entire width of the headband. Draw a smaller square inside. Next, draw the long lines of the "belt" on either side of the buckle ending in a point. Go back and add details such as stitch marks and belt holes.


xx,CC